


supplies needed:
Bright Easter by: Designing Scraps
this is a ptu scrap kit you can find HERE @ scrappin with friends
Paint shop pro
Alien skin Eyecandy 4000 Gradient Glow (plugin) optional.
Tube of choice
I am using the fairy that comes with the kit.
The level required to complete this tag is BEGINNER
This tutorial is my creation any semblance to another tutorial is purely coincidental and not intentional.
DO NOT CLAIM AS YOUR OWN. DO NOT SHARE.
If you want to share the tutorial you must share just the blog link so that they can come here and view it themselves.
YOU MAY USE THIS TUTORIAL TO CREATE TAGS FOR YOURSELF, FRIENDS, OR GROUPS YOU ARE IN.
TUTORIAL
Open your psp
create new document 600x600 px
Open the fallowing elements.Frame of choice
I am using BrightEater Circle frame 2
Copy and close the frame.
Now in your New Document go to edit and paste as new layer.
Resize the frame i am leaving a little more then an inch of blank spaces on the sides and top and bottom.
Arrange your frame as close to the middle as you can.
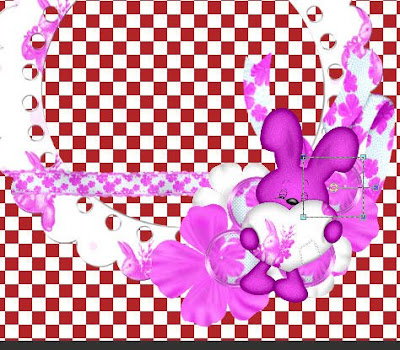
Now we are going to turn it into a cluster frame with some elements from the scrap kit.
I am going to use the pink and white bunched ribbon
The white flowers and the pink flowers
and the pink button with the flower inside it.
The pink bunny holding the white pillow.
Copy and paste each element to the frame
Resize to fit you should have something close to this now.
You will have to duplicate the buttons and flowers to show like mine.
IGNORE THE STRAIGHT RIBBON I TOOK THAT OFF THE FINAL TAG.
 Add a drop shadow to each element i used a light one 34 opacity pulled a little to the left.
Merge the elements together do not merge them to the frame leave that on its own layer.
Now you should have two layers the one with all the elements merged together and one with the frame.
Open your paper of choice i am using the pink paper with white dots NOT CRUMPLED.
Copy and paste as new layer.
Re size until you have something you like in the center of the frame i made mine a square a little bigger then the frame.
Use your magic wand and make sure the frame layer is your active layer (higlighted in the layers palette)
Click with your magic wand anywhere in the outside of the frame.
Go to selections invert.
Make your paper layer the active layer click on it in the layers palette.
Hit delete once on your keyboard.
Now your paper should only be in the center of the frame and nowhere else.
You can now add a drop shadow onto your fame now and merge visible.
Add your tube of choice. I am using the flying fairy from the kit BRIGHT EASTER.
Copy and paste as new layer close the original.
Merge visible again. Now you can add the word art and your name.
Use whatever font and write Easter Blessings place on top. Convert to raster and add a gradient glow. Same steps with your name. And you can even add the gradient glow to your copyright too.
Make sure you add the copy right. in this case
it is ©DNscraps
http://designingscraps.blogspot.com
Save it as a png or jpeg whichever you prefer and you have your finished tag.
Bright Easter by: Designing Scraps
this is a ptu scrap kit you can find HERE @ scrappin with friends
Paint shop pro
Alien skin Eyecandy 4000 Gradient Glow (plugin) optional.
Tube of choice
I am using the fairy that comes with the kit.
The level required to complete this tag is BEGINNER
This tutorial is my creation any semblance to another tutorial is purely coincidental and not intentional.
DO NOT CLAIM AS YOUR OWN. DO NOT SHARE.
If you want to share the tutorial you must share just the blog link so that they can come here and view it themselves.
YOU MAY USE THIS TUTORIAL TO CREATE TAGS FOR YOURSELF, FRIENDS, OR GROUPS YOU ARE IN.
TUTORIAL
Open your psp
create new document 600x600 px
Open the fallowing elements.Frame of choice
I am using BrightEater Circle frame 2
Copy and close the frame.
Now in your New Document go to edit and paste as new layer.
Resize the frame i am leaving a little more then an inch of blank spaces on the sides and top and bottom.
Arrange your frame as close to the middle as you can.
Now we are going to turn it into a cluster frame with some elements from the scrap kit.
I am going to use the pink and white bunched ribbon
The white flowers and the pink flowers
and the pink button with the flower inside it.
The pink bunny holding the white pillow.
Copy and paste each element to the frame
Resize to fit you should have something close to this now.
You will have to duplicate the buttons and flowers to show like mine.
IGNORE THE STRAIGHT RIBBON I TOOK THAT OFF THE FINAL TAG.
 Add a drop shadow to each element i used a light one 34 opacity pulled a little to the left.
Merge the elements together do not merge them to the frame leave that on its own layer.
Now you should have two layers the one with all the elements merged together and one with the frame.
Open your paper of choice i am using the pink paper with white dots NOT CRUMPLED.
Copy and paste as new layer.
Re size until you have something you like in the center of the frame i made mine a square a little bigger then the frame.
Use your magic wand and make sure the frame layer is your active layer (higlighted in the layers palette)
Click with your magic wand anywhere in the outside of the frame.
Go to selections invert.
Make your paper layer the active layer click on it in the layers palette.
Hit delete once on your keyboard.
Now your paper should only be in the center of the frame and nowhere else.
You can now add a drop shadow onto your fame now and merge visible.
Add your tube of choice. I am using the flying fairy from the kit BRIGHT EASTER.
Copy and paste as new layer close the original.
Merge visible again. Now you can add the word art and your name.
Use whatever font and write Easter Blessings place on top. Convert to raster and add a gradient glow. Same steps with your name. And you can even add the gradient glow to your copyright too.
Make sure you add the copy right. in this case
it is ©DNscraps
http://designingscraps.blogspot.com
Save it as a png or jpeg whichever you prefer and you have your finished tag.


Just a quick note to let you know that a link to this post will be placed on CraftCrave.com in the Graphics category today [17 Mar 12:53pm GMT]. Thanks, Maria
ReplyDelete